Are you tired of slow boot-up times and sluggish performance on your Acer Aspire A515-51G? Installing an SSD may be just the solution you need. Not only can it significantly improve your overall system speed, but it can also give your laptop a new lease on life. In this blog post, we’ll walk you through the step-by-step process of installing an SSD in your Acer Aspire A515-51G.
From selecting the right type of SSD to backing up your data and cloning your existing hard drive, we’ll cover everything you need to know to make the upgrade a success. If you’re new to the world of laptop hardware upgrades, don’t worry! We’ll make sure to explain everything in detail, using easy-to-understand language and plenty of analogies and metaphors. By the end of this post, you’ll be a pro at upgrading laptops, and your Acer Aspire A515-51G will be running like a dream.
So, let’s get started!
What you will need
If you’re looking to boost your Acer Aspire A515-51G’s performance and storage capacity, adding an SSD can make a world of difference. But how exactly do you go about putting one in? First things first, you’ll need to make sure you have all the necessary materials. This includes the SSD itself, of course, as well as a screwdriver to remove the laptop’s bottom cover, a SATA cable if your SSD doesn’t come with one, and a USB stick or external hard drive to back up your data.
Once you’ve got everything you need, it’s time to get to work. The process varies slightly depending on the exact model of your Aspire A515-51G, but generally speaking, you’ll need to remove the laptop’s bottom cover, locate the SATA connector for the existing hard drive, and connect your new SSD to it using the SATA cable. You may need to adjust some settings in your computer’s BIOS to ensure it recognizes the new SSD, but once you’ve done that, you’ll be good to go!
SSD Compatibility Check
If you plan on upgrading your computer by adding a solid-state drive (SSD), there are a few things you will need to consider before getting started. First, you need to check your current computer’s compatibility with an SSD. This involves checking the type of interface your computer uses to connect to its hard drive.
The two most common interfaces are SATA and PCIe, so you need to make sure that your computer’s motherboard has a compatible slot to connect your chosen SSD. Additionally, you’ll want to check the size and form factor of your current drive. Many modern SSDs are the same size and shape as
5-inch hard drives, but some may require special mounting brackets or be smaller, like M.2 drives. By taking the time to check compatibility beforehand, you can ensure a smooth and successful upgrade process for your computer.
Screwdriver
If you’re planning on fixing something around the home, having a basic tool kit is essential. One of the most necessary tools in your kit is a screwdriver. But if you’ve never bought one before or you’re not sure which type to get, it can be confusing.
Here’s a breakdown of what you’ll need: Firstly, consider the type of screwdriver you need. There are two types to choose from: flathead and Phillips. The flathead is better for larger screws, while the Phillips can handle smaller screws and is more common in modern applications.
It’s wise to invest in a set that includes both types. Next, think about the size of the screwdriver you need. It’s essential to match the size of the screw head with the screwdriver.
If the screwdriver is too small, you’ll struggle to turn it. If it’s too big, it won’t fit, and you’ll end up damaging the screw head. Finally, if you’re looking for a more versatile option, consider a drill-bit screwdriver.
It can be used with a power drill for faster work and comes with interchangeable bits to fit different screw types. In conclusion, a screwdriver is a must-have tool in your kit. When choosing one, ensure you consider the type, size, and versatility to meet all your home repair needs.
With your new screwdriver, you’ll be able to tackle all kinds of DIY projects with ease.
SATA Cable (Optional)
If you’re building a desktop computer, one of the things you might consider is getting a SATA cable. This cable can be used to connect your hard drive or solid-state drive to your motherboard, allowing data to be transmitted between the two. However, it’s important to note that SATA cables aren’t always necessary.
In some cases, your motherboard may come with SATA cables already attached, or you might be able to use an existing cable from another device. It’s worth double-checking before you buy a SATA cable, as they can be expensive and you don’t want to waste money on something you don’t need. If you do decide to purchase a SATA cable, make sure you choose one with the right connectors for your devices.
Some cables have different types of connectors on each end, so it’s important to check that they’re compatible with your hard drive and motherboard. Ultimately, whether or not you need a SATA cable will depend on your specific setup, but it’s definitely something to consider if you’re building a new computer.
SSD Cloning Software (Optional)
When upgrading your computer’s hard drive to an SSD, you might want to consider cloning the data from your old drive to the new one. This can make the transition smoother and allow you to keep all your important files and settings intact. To do this, you will need SSD cloning software, which can be purchased online or sometimes comes bundled with the new SSD.
Make sure to check the compatibility of the software with your specific operating system and follow the instructions carefully to avoid losing any data or encountering errors. While it is not necessary to clone your old drive, it can save you time and hassle in the long run and ensure a seamless transition to your new SSD.
Backing Up Data (Optional)
If you’re looking to upgrade your Acer Aspire A515-51G with an SSD, it’s important to backup your data before starting the process. While it’s not absolutely necessary, it’s always a good idea to have a backup of your files in case something goes wrong during the installation. This will help ensure that you don’t lose any important documents, photos, or other files that you’ve accumulated over time.
You can backup your data using an external hard drive, cloud storage, or a USB flash drive. Once you’ve backed up your data, you can proceed with the SSD installation by following the manufacturer’s instructions and taking the necessary precautions to avoid damaging your laptop. With a new SSD, you’ll experience faster boot up times and improved overall performance that will make a noticeable difference in your computing experience.
Create Backup Drive
Backing up your data is crucial in case of system failure or accidental file deletion. One way to ensure your files are safely stored is by creating a backup drive. This can be an external hard drive or a USB flash drive.
The process is simple, just connect your backup drive to your computer and select the files and folders you want to back up. You can choose to manually back up your files or set up automatic backups on a regular basis. It’s important to keep your backup drive in a safe location away from potential hazards such as water or heat.
By creating a backup drive, you can rest easy knowing that your important data is securely backed up and easily accessible if needed.
Backup Data to External Storage
Backing up data to external storage is an optional but crucial step in ensuring the security and accessibility of important files. External storage devices offer a safe and reliable way to protect data from accidents, theft, and system crashes. These devices include USB flash drives, external hard drives, and cloud storage services.
Moreover, they allow users to keep a separate copy of their files, which can be accessed even when their primary device is unavailable. While some devices provide automatic backup features, others require users to transfer the data manually. It’s important to note that regular backups are essential, especially for businesses or individuals with sensitive data.
So, don’t neglect the importance of data backup and conveniently secure your files with external storage devices.
Opening the Laptop Case
If you’re looking to upgrade your ACER Aspire A515-51G laptop with an SSD, you’ll first need to open up the laptop case. I know it can be intimidating to crack open your laptop, but it’s a necessary step to access the hardware inside. First, make sure your laptop is powered off and unplugged.
Then, locate and remove the screws that hold the bottom panel in place. They may be hidden under rubber feet or labels, so be sure to check thoroughly. Once you’ve removed the screws, use a plastic pry tool or credit card to gently pry open the case.
Be careful not to damage any of the components inside. You should now be able to access the hard drive and install your new SSD. Just remember to handle all the components gently, and make sure everything is securely fastened in place before closing up the case again.
With your new SSD installed, you’ll enjoy much faster boot times and program load times, making your laptop feel like a brand new machine.
Shut Down and Unplug Laptop
When it comes to opening up your laptop case, it’s important to shut down and unplug your laptop first. This not only protects the internal components of your laptop, but also ensures your safety while opening the case. Once your laptop is turned off and unplugged, you can start the process of opening up the case.
Depending on your laptop model, the process may vary, but in general, you’ll need to remove the screws that hold the case together. It’s important to keep track of where each screw belongs, as they can vary in size and placement. If this is your first time opening up your laptop case, it’s a good idea to take pictures or videos as you go along for future reference.
By following these steps and taking the necessary precautions, you can safely open up your laptop case and make any necessary repairs or upgrades.
Remove the Back Cover
Removing the back cover of your laptop case may seem intimidating, but it’s actually a straightforward process. The first step is to locate and remove any screws that are holding the back cover in place. You’ll typically find these screws around the four corners of the back cover, as well as along the sides or bottom.
Once you’ve removed all of the screws, gently pry the back cover away from the base of the laptop using a credit card or small plastic tool. Be careful not to use too much force, as this can damage the delicate components inside. With the back cover removed, you’ll have access to the inner workings of your laptop, including the battery, hard drive, and RAM.
Whether you’re upgrading your laptop or performing a repair, opening the case is a critical first step. With a little care and patience, anyone can remove the back cover and gain access to their laptop’s internal components.
Adding SSD to Acer Aspire A515-51G
If you’re looking to speed up your Acer Aspire A515-51G, adding an SSD (solid-state drive) is a great way to do it. Not only will it improve your computer’s boot and load times, but it will also provide more storage space than your traditional hard drive. To add an SSD, first, make sure you have the right size and connector type.
Once you have your SSD, locate the hard drive compartment on the laptop and remove the screws holding the cover in place. Then, gently remove the hard drive by pulling on the connector tab. Replace it with the SSD, making sure the connector is secure and reinstall the cover screws.
It’s that simple! Now, when you turn on your laptop, your new SSD will quickly boot up, and your programs and files will load faster than ever before. So next time you find yourself thinking, “Acer Aspire A515-51G how to put SSD?” Just remember, it’s easy, quick, and will provide a noticeable improvement in your computer’s performance.
Locate the SATA Connection Point
If you’re looking to add an SSD to your Acer Aspire A515-51G, the first step is to locate the SATA connection point. This is where you’ll connect the SSD to your motherboard. The SATA connection point is usually located near the hard drive bay, which is typically at the bottom of the laptop.
You’ll need to remove the bottom cover of your laptop to access the hard drive bay. Once you’ve found the SATA connection point, you’ll need to connect the SSD to your motherboard using a SATA cable. Make sure you secure the cable properly to prevent any accidental disconnections.
Adding an SSD to your laptop can significantly improve its performance and speed up its boot times, so it’s definitely worth the effort to install one.
Insert the SSD
If you’re looking to add some extra storage to your Acer Aspire A515-51G, then inserting an SSD is a great option. Not only will it give you more storage space, but it can also improve your computer’s overall performance. The first step is to turn off your laptop and make sure it’s unplugged from any power source.
Then, locate the hard drive compartment on the bottom of your laptop. Carefully remove the screws and take off the cover. You should see your current hard drive in place.
Take it out, and replace it with your new SSD. Make sure it’s securely in place, and then put the cover back on. Voila! You now have an extra SSD in your Acer Aspire A515-51G.
With your added space and faster performance, you’ll be able to store more files and complete tasks more efficiently.
Connect SATA Cable (Optional)
If you want to improve the performance of your Acer Aspire A515-51G, adding an SSD can help. Once you have purchased an SSD, the next step is to connect the SATA cable. While this step is optional, it can make a big difference in terms of speed and reliability.
Before you start, make sure that your laptop is turned off and unplugged. You will need to open up the back panel of the laptop to access the internal components. Look for the SATA connector on the motherboard and plug in the cable accordingly.
This is a small but important step that can greatly improve your laptop’s performance and make it feel like new again. With the SSD and SATA cable properly installed, you will notice faster boot times, smoother multitasking, and quicker program loading times.
Configuring BIOS Settings
If you’re looking to upgrade your Acer Aspire A515-51G by installing an SSD, one of the key steps in the process is configuring your BIOS settings. With a few simple changes, you can make sure that your computer recognizes the new SSD and is able to boot up properly from it. To get started, access your BIOS by restarting your computer and pressing the F10 key.
Once you’re in, look for the “SATA Mode” option and change it to “AHCI.” This will ensure that your computer can communicate properly with the new SSD. You may also want to disable “Secure Boot” and set your boot order so that the SSD is the primary boot device.
With these changes in place, you should be able to install your new SSD and enjoy faster speeds and better performance from your Acer Aspire A515-51G.
Accessing BIOS
Accessing BIOS can be a tricky process for some computer users, but it is essential to configure the settings correctly to ensure optimum performance. BIOS settings are responsible for determining various hardware and software configurations in a computer. To access BIOS, you need to restart your computer and press a specific key, usually F2, F10, or Del, depending on your computer’s make and model.
Once you access BIOS, you can navigate through various settings such as boot order, overclocking options, and power management features, to name a few. It’s crucial to be cautious when configuring BIOS settings since one wrong move can render the computer unusable. However, it’s also an opportunity for computer enthusiasts to tinker with the settings and get the most out of their computer’s hardware.
By adjusting the settings, your computer can run faster and be more efficient, meeting your specific needs. Keyword: Configuring BIOS Settings
Configuring Boot Order
Configuring BIOS Settings is a crucial process for any computer user, especially when it comes to boot order. BIOS (Basic Input/output System) is responsible for managing hardware and software interactions on a computer. Boot order refers to the sequence in which the computer boots up from different storage devices such as hard drives, CD/DVD drives, USB drives, etc.
It is essential to set the boot order correctly to ensure that your computer starts up from the correct device and doesn’t run into any issues. To configure the BIOS settings and change the boot order, you need to access the BIOS configuration utility during boot-up by pressing a specific key typically displayed on the start-up screen. Once you are in the BIOS, navigate to the boot order section, and choose the devices that are connected to your computer and should be used for booting up.
It’s important to prioritize the devices you want your computer to boot from first. Configuring BIOS settings for boot order might sound daunting, but it is a fairly simple process that can save you considerable time and frustration down the line.
Cloning the Main Drive (Optional)
If you’ve recently upgraded your Acer Aspire A515-51G laptop with a new SSD, you might consider cloning your main drive. This step is entirely optional, but it can save you a lot of time and effort once you start using your new SSD. Cloning the main drive means creating an exact replica of your original hard drive, including all the installed programs, files, and settings.
This process can be done using specialized software, such as EaseUS Todo Backup or Macrium Reflect. Once you have the software installed, you can connect your new SSD to your laptop (using an external enclosure or a SATA-to-USB adapter), and initiate the cloning process. This can take anywhere from a few minutes to several hours, depending on the size of your main drive.
When the process is completed, you can shut down your laptop, remove the old hard drive and replace it with the new SSD. Your laptop should boot up normally, with all the familiar programs and settings. Cloning the main drive can save you the hassle of reinstalling all your apps and transferring your files manually, but it’s primarily recommended for advanced users who are confident in their technical skills.
Download and Install Cloning Software
If you’re looking to clone your main drive, the first step is to download and install cloning software. There are a variety of options available online, but some popular choices include Clonezilla, Acronis True Image, and EaseUS Todo Backup. Once you’ve selected the software you want to use, make sure to follow the installation instructions carefully.
Before starting the cloning process, it’s important to remember that this step is optional and should only be done if you have a specific reason for cloning your main drive. Cloning your drive can be useful if you want to create a backup in case of data loss or if you’re upgrading to a new hard drive and want to transfer your files and settings seamlessly. However, it’s important to keep in mind that cloning can be a time-consuming process and there is a risk of data loss if something goes wrong.
To clone your main drive, open the cloning software and select the option to “clone” or “mirror” your drive. You’ll then need to select your main drive as the source and the destination drive where you want to clone your data. Some software may also allow you to choose specific partitions to clone.
Once you’ve made your selections, start the cloning process and wait for it to complete. This can take anywhere from several minutes to several hours depending on the size of your drive and the speed of your computer. Once the cloning process is complete, you’ll have an exact copy of your main drive on the destination drive, ready to use whenever you need it.
Remember to always backup your data regularly, and keep your cloning software and antivirus updated to ensure the safety and security of your files and computer. By following these steps and using reliable software, you can easily clone your main drive and have peace of mind knowing your data is safe and secure.
Connect SSD to Laptop
If you’re planning on connecting an SSD to your laptop, you may want to consider cloning your main drive. Cloning is essentially creating an exact copy of all the data from your current drive onto the new SSD. This is an optional step, but it can save you a lot of time and hassle in the long run.
To clone your main drive, you’ll need to use specialized software such as Acronis True Image or EaseUS Todo Backup. These tools will guide you through the cloning process, which involves connecting both the old drive and new SSD to your laptop, selecting the source and destination drives, and then running the software to start the cloning process. Once the cloning is complete, you’ll need to physically replace the old drive with the new SSD.
This will involve opening up your laptop, locating the old drive, and carefully removing it from its slot. Then, you’ll need to attach the new SSD in its place, making sure it’s securely fastened and all connections are properly seated. Once you’ve replaced the old drive with the new SSD, you should be able to start up your laptop as normal.
The biggest difference you’ll notice is the significantly faster boot and load times, thanks to the faster read and write speeds of the SSD. Overall, cloning your main drive is a useful step to take when connecting an SSD to your laptop. It ensures all your data and programs are transferred over to the new drive, making the transition as seamless as possible.
Follow Cloning Software Process
If you’re looking to upgrade your computer’s hard drive, or simply want to create a backup of your current one, cloning software can be a great tool to use. One step you might consider when using this software is cloning your main drive. This way, if anything were to happen to your computer’s main drive, you could easily switch to the cloned drive without losing any data or settings.
To do this, simply select the option to clone your main drive within the software and follow the prompts. Keep in mind that this step is optional and may not be necessary for everyone. However, if you want the added peace of mind and convenience, it might be worth considering.
Overall, using cloning software can be a great way to protect your data and ensure that you’re always prepared for the unexpected.
Closing the Laptop Case
If you’re looking to upgrade your Acer Aspire A515-51G’s storage capabilities, adding an SSD can make a huge difference in performance. The process of installing an SSD is fairly simple, but closing the laptop case can be a bit tricky. Make sure all of your cables are properly connected and the SSD is securely in place before attempting to close the case.
Once you’re ready, carefully align the two halves of the case and see if they snap back together. If they don’t, don’t force it- there may be a tab or screw that needs to be adjusted. Once you successfully close the case, you’ll be able to reap the benefits of faster and more reliable storage.
Reinstall Back Cover
Reinstalling the back cover of your laptop is an important step in completing the task of repairing or upgrading components in your device. Once everything has been properly installed and connected inside the laptop, it’s time to turn your attention to the exterior. Lining up the cover with the hinges, carefully lower the back cover into place.
Press it firmly into place, making sure that it snaps into all of the locking mechanisms. Give it a gentle shake to test its stability and ensure that there are no loose parts or rattling components. Once you’re confident that everything is secure, power on the device and enjoy your newly improved laptop! By following these simple steps, you can extend the life of your device and improve its performance for years to come.
Testing the SSD and Reverting Changes
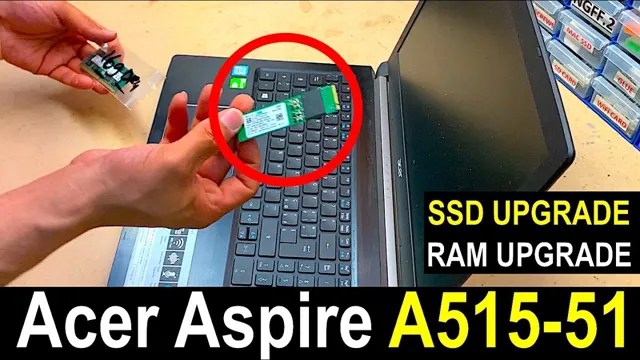
If you’re looking to upgrade the storage on your Acer Aspire A515-51G laptop by adding an SSD, it’s easier than you may think. First, you’ll need to check that your laptop has an unused M.2 slot, which is usually located near the Wi-Fi card.
Once you have the correct SSD, carefully insert it into the M.2 slot and secure it with a screw if necessary. Before you start using your new SSD, it’s important to test that it’s working correctly.
You can do this by accessing your laptop’s BIOS and checking that the SSD is recognized as a storage device. Next, you may need to make changes to your laptop’s boot order to ensure that it boots from the new SSD instead of the old hard drive. If you encounter any issues or want to revert back to your old setup, simply remove the SSD and replace the original hard drive.
By following these steps, you can easily upgrade your Acer Aspire A515-51G with a new SSD and enjoy faster storage and improved performance.
Boot the Laptop and Check SSD
After installing the new SSD into your laptop, it’s time to test it out. Boot up your laptop and check if it recognizes the new drive. This can be done by accessing the BIOS or UEFI settings and checking the storage configuration.
If the new drive is properly recognized, it means that the installation was successful. You can also run benchmarks and disk speed tests to gauge the performance of your new SSD. However, if the laptop fails to recognize the SSD, there might be an issue with the installation or compatibility.
In this case, you might need to revert back to the old drive and troubleshoot the problem. It’s always better to conduct a thorough testing process to avoid any potential issues down the line.
Revert BIOS Settings (Optional)
If you’ve made changes in your BIOS settings to optimize your SSD’s performance and you want to test if it’s working as expected, you can benchmark it with performance testing software like CrystalDiskMark. This tool will give you an idea of how fast your drive is in sequential and random read/write operations. If you’re satisfied with the results, congrats! You’ve successfully optimized your SSD.
However, if you encounter issues like blue screens or slow boot-up times, you may need to revert to your old BIOS settings and start over. Reverting BIOS settings is optional but can help resolve any problems that may have arisen from incorrect settings. Just make sure you take note of your old settings and be careful not to mess up anything else in the process.
It’s always best to make small changes and test your system’s stability before making bigger ones. With a little patience and care, you can optimize your SSD and enjoy faster PC performance.
Deleting Old Files (Optional)
After deleting old files, it’s time to test the SSD and see if it’s running optimally. This step is completely optional, but if you want to make sure everything is working correctly, it’s worth doing. To conduct the test, you can run a disk speed test, which will measure the read and write speeds of your SSD.
If you have upgraded from a hard drive to an SSD, you should see a significant improvement in performance. Keep in mind that the speed of your SSD may decrease over time, so it’s a good idea to test it periodically and revert changes if necessary. By monitoring your SSD’s performance, you can prolong its lifespan and make sure it’s operating at its best capacity.
Conclusion
In conclusion, upgrading your Acer Aspire A515-51G with an SSD may seem daunting at first, but fear not! With a few simple steps, you can easily put an SSD in your laptop and experience lightning-fast speeds and increased performance. So why settle for a slow and sluggish laptop when you can have the power of an SSD at your fingertips? Upgrade today and never look back!”
FAQs
What is the maximum SSD capacity that can be installed in Acer Aspire A515-51G?
The maximum SSD capacity that can be installed in Acer Aspire A515-51G is 1TB.
Is it possible to add an SSD to Acer Aspire A515-51G without removing the existing hard drive?
Yes, it is possible to add an SSD to Acer Aspire A515-51G without removing the existing hard drive by using a hard drive caddy.
Can I install the operating system on the new SSD in Acer Aspire A515-51G?
Yes, you can install the operating system on the new SSD in Acer Aspire A515-51G by cloning your existing hard drive to the new SSD.
Do I need any special software or tools to install an SSD in Acer Aspire A515-51G?
No, you do not need any special software or tools to install an SSD in Acer Aspire A515-51G. However, you will need a screwdriver to open the back cover and a SATA cable to connect the SSD to the motherboard.