If you’ve recently purchased an M.2 SSD or are in the process of upgrading your computer’s storage, you may be feeling overwhelmed by the abundance of tiny screws that come with these drives. Finding the perfect M.
2 SSD screw can be frustrating, but don’t worry – we’ve got you covered. In this blog post, we’ll guide you through the process of finding the right screw for your M.2 SSD.
We’ll cover all the important details like size, threading, and even materials, so you can make an informed decision and get your SSD installed in no time. So sit back, relax, and let’s get started!
Why M.2 SSD Screws Matter
M.2 SSD screws may seem like a small detail, but they actually play a crucial role in the installation and functionality of these powerful storage devices. These tiny screws ensure that the SSD is securely fastened to your motherboard, preventing any movement or vibrations that could potentially damage the hardware.
Without the proper screws, your M.2 SSD could become loose over time, leading to performance issues and even crashes. It’s important to note that M.
2 SSD screws come in different sizes, so be sure to double-check your motherboard’s specifications before making a purchase. Investing in high-quality M.2 SSD screws may seem like a small expense, but it can greatly benefit your system’s overall functionality and lifespan.
Preventing Damage to Your M.2 SSD
If you’re using an M.2 storage solution in your computer build, you need to pay attention to the small screws that hold it in place. These tiny screws may seem inconsequential, but they can actually make a big difference in preventing damage to your SSD.
M.2 SSDs are delicate components that can be easily damaged by physical force, including the pressure exerted by improperly fastened screws. To ensure that your M.
2 SSD stays in good condition and retains optimal performance, make sure that you use the correct screws when installing it. Don’t rely on random screws lying around, as they may not be the right size or shape for your particular M.2 SSD.
Use the screws that came with your SSD kit, and secure them just tight enough to hold the drive in place without applying too much pressure. With the right screws and careful installation, you can avoid damaging your M.2 SSD and enjoy fast, reliable storage for years to come.

Ensuring Proper Performance
M.2 SSD screws may seem like a minor detail, but they can have a significant impact on the performance of your SSD. The screws ensure that the SSD is properly secured in its slot, preventing it from moving and potentially causing data corruption or damage to the SSD.
Without the proper screws, the SSD may not function as intended and could even fail prematurely. It’s important to make sure you use the correct size and type of screw for your M.2 SSD to guarantee optimal performance.
Just like a racecar needs all its parts functioning in harmony, a computer needs all its components working correctly to achieve its maximum potential. So, when it comes to installing an M.2 SSD, don’t overlook the importance of the screws.
They may be small, but they play a big role in ensuring proper performance and longevity.
Types of M.2 SSD Screws
When it comes to installing an M.2 SSD, it’s essential to have the right type of screw. There are three types of M.
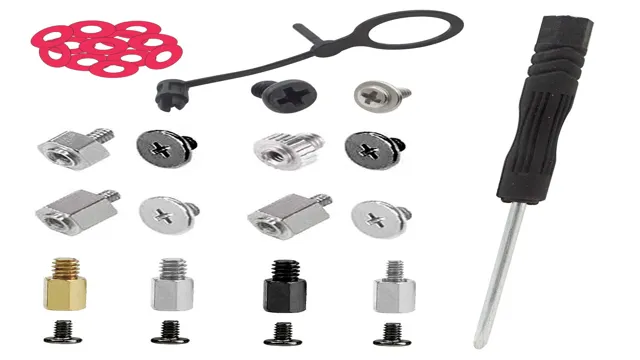
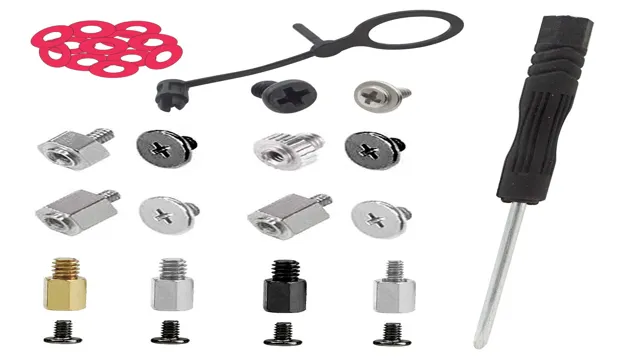
2 SSD screws: stand-off, standard, and thermal pad screws. The stand-off screw is the most common and has a hexagonal head that helps in screwing it into the motherboard. The standard screw has a cylindrical head with threads on the bottom.
It’s used for securing the M.2 drive directly onto the motherboard. And lastly, the thermal pad screw is used for extra thermal transfer between the M.
2 drive and the motherboard to prevent overheating. It’s vital to check your motherboard’s manual to know which screw to use for your M.2 SSD installation.
Using the wrong screw or failing to install one entirely can lead to damage to your SSD or your motherboard. So, make sure you use the correct M.2 SSD screw to ensure a smooth and successful installation of your SSD.
Understanding Screw Sizes and Styles
When it comes to M.2 SSD screws, there are two common types that you may encounter: standoffs and screws with a head. Standoffs are typically used to elevate the SSD and secure it to the motherboard.
They come in various sizes and thread types, including M2 and M5, so it is important to check the specifications for your specific SSD and motherboard. The screws with a head that are used in M.
2 SSD installations are usually M5 screws, and come in various lengths to accommodate different SSD thicknesses. It is important to use the right size and type of screw for your installation to ensure a secure hold and prevent damage to your equipment.
Take care when handling these small screws, as they can be easily misplaced or dropped. A magnetic screwdriver may be helpful in keeping them in place during installation.With these tips, you’ll be able to install your M.
2 SSD with confidence.
Compatibility with M.2 SSD Standards
When it comes to M.2 SSDs, one important aspect to consider is the type of screw used to secure the drive in place. M.
2 SSDs typically use either a small metal screw or a plastic spacer to fasten the drive onto the motherboard. The most common screw type is the M5 screw, which is a small screw with a diameter of
5mm. This screw type is used for most M.2 SSDs on the market and can be found in most hardware stores.
However, some motherboards and SSDs may require a different type of screw, such as the M3 or M4 screw. It’s important to double-check the specifications of your motherboard and SSD to ensure compatibility and to avoid damaging your hardware. In addition, some M.
2 SSDs come with pre-installed spacers that allow for easy installation without the need for a screw. Overall, understanding the types of screws and spacers used with M.2 SSDs is important to ensure a successful and safe installation.
What to Do If You Can’t Find the Right Screw
If you’re upgrading your M.2 SSD, one of the most frustrating things can be when you can’t find the right screw to secure it in place. The truth is, there are a few different types of screws that can be used with M.
2 SSDs, and not all of them are easily interchangeable. The most common types of M.2 SSD screws are M2x3mm, M2x5mm, and M2x8mm.
It’s essential to figure out which one you need before you start your upgrade process. So, if you can’t find the screw that came with your SSD, don’t worry, you still have options. You can potentially find a compatible screw in your computer case, or you can purchase a replacement screw online or at a hardware store.
Just make sure to measure the size of the screw hole before purchasing to ensure a proper fit.
Tips for Installing Your M.2 SSD Screw
If you’re planning to install an M.2 SSD in your computer, you’ll need to have an M.2 SSD screw handy to secure it in place.
These tiny screws are easy to lose and can be quite tricky to install, so here are some tips to make the process go smoothly. First, make sure you have the right screw for your specific M.2 SSD.
These screws can vary in size and threading, so double-check before you start. Next, use a magnetic screwdriver to hold onto the screw and keep it from falling into hard-to-reach places. Carefully insert the screw into the designated hole on your motherboard or adapter, and gently tighten it until it’s snug without over-tightening.
And that’s it! With these tips, you can confidently install your M.2 SSD screw without any issues.
Tools You’ll Need
When it comes to installing your M.2 SSD, one important tool you’ll need is a screwdriver. Specifically, you’ll need a small, precision screwdriver that can fit into the tiny screw holes found on your M.
2 SSD. It’s important to select a screwdriver that is the correct size and shape for your particular SSD, as using the wrong size or shape can cause damage to the SSD, rendering it unusable. Once you have your precision screwdriver in hand, carefully line up the screw holes on your M.
2 SSD with those on your motherboard, and gently tighten the screw until it feels secure. Keep in mind that while it’s important to make sure the screw is tight enough to hold the SSD in place, over-tightening can also cause damage. With these tips in mind, you’ll be well on your way to installing your M.
2 SSD like a pro!
Step-by-Step Guide to Installation
If you’re looking to install an M.2 SSD, then you’ll want to make sure you have all the necessary components. One of the things you’ll need to consider is the screw that will hold the SSD in place.
While it may seem like a small detail, choosing the right screw and ensuring a secure installation is important. Here are some tips you should keep in mind when installing your M.2 SSD screw to ensure a hassle-free process.
First off, it’s important to identify the screw size needed for your specific SSD. This information is typically provided in the manufacturer’s documentation or on their website. Once you have this information, you can purchase the right screw or use the one that came with the SSD.
When it comes to installation, it’s crucial to be gentle but firm. You don’t want to overtighten the screw, as this can damage the SSD. But you also don’t want it to be too loose, as this can result in slow read and write speeds or even data loss.
Use your screwdriver to gently tighten the screw until it feels snug, making sure not to apply excessive pressure. In addition, it’s a good idea to periodically check the screw to ensure it remains tightened properly. While it’s rare for screws to come loose, it’s not impossible.
A loose screw can cause your SSD to shift within its slot and potentially damage the motherboard. In conclusion, paying attention to the small details, such as ensuring the correct screw and properly tightening it, can make a huge difference in the performance and longevity of your M.2 SSD.
Conclusion: Don’t Overlook the Importance of the M.2 SSD Screw
In the world of technology, the smallest details can make a difference. This is especially true when it comes to the humble M.2 SSD screw.
Though it may seem insignificant, this tiny screw holds the power to secure your precious SSD in place, ensuring that your data stays safe and your system performs at its best. So the next time you’re tightening an M.2 screw, remember that every little thing counts, and that even the smallest screw can make a big impact.
“
FAQs
What type of screw is needed to secure an M.2 SSD?
The screw needed to secure an M.2 SSD is commonly a small and fine-threaded screw that can be either M2 or M2.5 in size.
Are M.2 SSD screws universal or specific to the motherboard?
Most M.2 SSD screws are universal and can be used with any motherboard that supports M.2 SSDs.
Can M.2 SSD screws be reused if I need to remove the drive?
Yes, M.2 SSD screws can be reused if they are not damaged or stripped during the removal process.
What is the recommended torque setting for tightening M.2 SSD screws?
There is no specific torque setting recommended for securing M.2 SSD screws, but it is recommended to tighten them snugly without over-tightening to avoid damaging the drive or the motherboard.
