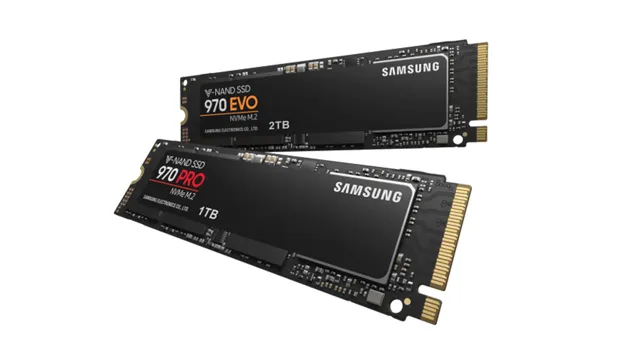
Are you looking to boost the performance of your computer or laptop? Consider installing the Samsung 970 Pro SSD! This high-speed solid-state drive can revolutionize the way your device operates, with lightning-fast data transfer rates and enhanced storage capabilities. However, you may be wondering how to go about installing the 970 Pro SSD Samsung on your device. Fear not – in this step-by-step guide, we have you covered! We’ll walk you through the entire process of installing the 970 Pro SSD Samsung, from preparing your device to transferring data and optimizing your settings.
Whether you’re a computer whiz or a complete novice, this guide is designed to be easy to follow, with clear and concise instructions to guide you every step of the way. So, let’s get started! With the Samsung 970 Pro SSD and this guide in hand, you’ll be well on your way to a faster, more efficient device in no time.
Preparation
If you’re looking to upgrade your computer’s storage capacity or speed, the 970 PRO SSD from Samsung is a great option. Before installing this powerful piece of hardware, it’s important to prepare your computer for the transition. Firstly, ensure that your computer is turned off and unplugged from the power source.
You should also consider backing up any important data to an external hard drive or cloud storage solution, as installing a new SSD can sometimes result in data loss or corruption. Once your computer is backed up and safely unplugged, locate the PCIe slot on your motherboard where you will install the SSD. Next, you will need to remove any existing M.
2 or PCIe devices that may be occupying the slot. Finally, insert the 970 PRO SSD into the slot and use the screws provided to secure it in place. With the proper preparation and installation, your computer will be running at lightning-fast speeds with the help of your new Samsung 970 PRO SSD.
Check system compatibility
Before installing any software on your computer, it’s crucial to check system compatibility. The last thing you want to deal with is a program that won’t run or causes errors due to hardware or software limitations. To prepare for an installation, start by reading the system requirements for the program.
Check the operating system, processor, RAM, and storage requirements to ensure your computer can handle the software. It’s also essential to confirm that your computer doesn’t have any conflicting programs or settings that will interfere with the new software. By taking the time to prepare your system, you can avoid frustrating errors and have a smoother installation experience.
So, before you hit that download button, make sure your computer is ready to handle it!
Gather necessary tools and equipment
The first step in any project is preparation, and when it comes to DIY, gathering the necessary tools and equipment is essential. Before starting any project, it’s important to think about what materials and tools you’ll need to get the job done right. Consider the scope of the project and any potential obstacles you may face along the way.
That way, you can be sure to have everything you need on hand to get the job done efficiently. Some projects may require specific tools or equipment, and it’s essential to make sure you have those items before starting. It can be frustrating to start a project only to realize halfway through that you’re missing a critical tool.
By being proactive and gathering all your tools ahead of time, you can ensure that your project runs smoothly and without any hiccups. Whether it’s a new drill, saw, or hammer, having the right tools for the job makes all the difference. Remember, a good craftsman always has the right tools for the job!
Opening the Computer
If you’re looking for a fast and reliable SSD, the 970 Pro from Samsung is definitely worth considering. Installing it into your computer is a straightforward process but requires a little bit of know-how. First, you need to open up your computer to access the M.
2 slot where the SSD will be installed. Depending on your computer’s design, this might involve removing screws or simply sliding off the case cover. Once you have access to the M.
2 slot, carefully insert the 970 Pro SSD, making sure it’s properly aligned with the keyway. Then, tighten any screws needed to secure it in place. Finally, close up your computer and boot it up to ensure that the new SSD is recognized by your operating system.
With the 970 Pro SSD installed, you’ll enjoy lightning-fast read and write speeds, and increased storage capacity to store all your important files.
Shut down the computer
Opening the Computer Opening the computer is a simple task that many people may take for granted. To start, ensure that all cables are securely connected to the computer. When you press the power button, the computer will start up and prompt you to enter your login credentials.
Once you have logged in, you will be able to access your desktop and all of your applications. It’s important to note that opening the computer should only be done when necessary, as prolonged use can lead to potential hardware issues and overheating. Always make sure to shut down the computer properly when you’re finished using it to avoid any data loss or damage to the device’s components.
Remember, it’s better to be safe than sorry!
Unplug all cables and devices
When it comes to opening your computer, it’s important to unplug all cables and devices before you start. This might seem like common sense, but you’d be surprised how many people forget this crucial step and end up damaging their computer or causing a short circuit. Not only does unplugging your computer make it safer to work on, but it also removes any potential interference or static electricity that can disrupt the delicate components inside.
So before you crack open that case, take a few minutes to gather up all the cables and devices and unplug them from your computer. This way, you can work on your computer without worrying about causing any damage or getting zapped by static electricity.
Remove the computer case
To access the internal components of your computer, you will need to remove the computer case. This process can vary depending on the model, but the general steps remain the same. First, turn off the computer and unplug it from the power source.
Then, locate the screws that hold the case in place and remove them using a screwdriver. You may also need to release any latches or push buttons that secure the case. Once the case is loose, gently slide or lift it away from the chassis.
Be careful not to pull on any wires or cables during this process. With the case removed, you can now see the motherboard, hard drive, and other components. This gives you full access to upgrade or replace parts as needed.
Just remember to take precautions when handling sensitive electronics, such as wearing an anti-static wristband to avoid damaging the components.
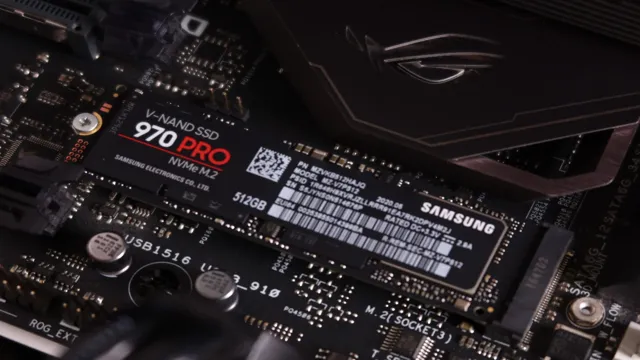
Locating the M.2 Slot
Installing a Samsung 970 Pro SSD can significantly boost your computer’s performance. However, before you can install it, you need to locate the M.2 slot on your motherboard.
This slot is usually located near the bottom of the board and is often marked with the letters “M.” Alternatively, you can consult your motherboard’s manual to locate the M.
2 slot. Once you have found the slot, gently insert the SSD into it, making sure that it is securely in place. Be careful not to touch the gold contacts when handling the SSD, and make sure to screw it in tightly if your motherboard has a screw to secure the SSD in place.
With the SSD properly installed, your computer should now be ready to take advantage of its lightning-fast speeds and increased storage capacity.
Identify the M.2 slot on the motherboard
If you are looking to install an M.2 SSD on your motherboard, the first step is to locate the M.2 slot.
The M.2 slot is a small, rectangular slot on the motherboard, typically located near the edge of the board. To identify the M.
2 slot, look for a slot labeled “M.2”, “NVMe”, or “PCIe”. The slot may also be labeled with a number indicating its length, such as “2242”, “2260”, or “2280”.
It is important to check the motherboard manual to confirm the location and compatibility of the M.2 slot before installation. Once you have located the slot, gently insert the M.
2 SSD into the slot at a 30-degree angle, making sure to align the notches on the SSD with the pins in the slot. Secure the SSD in place with the screw provided, and you are ready to go. With this guide, you are now equipped to identify the M.
2 slot and install your M.2 SSD with confidence.
Inserting the SSD
Installing the 970 Pro SSD by Samsung is a straightforward process that can be done by anyone, even those without technical knowledge. Start by turning off your computer and disconnecting all cables. Once the case is open, you’ll need to find the motherboard and locate the PCIe slot where the SSD will be installed.
Before inserting the SSD, remove the protective cover and gently slide it into the slot until it clicks into place. Be careful not to force it in too hard, as this could damage your motherboard. Once the SSD is secured, you can reconnect all cables, close the case, and power up your computer.
It’s that simple! With the 970 Pro SSD, you’ll experience lightning-fast speeds and enhanced performance, making it the perfect addition to your system.
Insert the 970 Pro SSD into the M.2 slot
To install your 970 Pro SSD into the M.2 slot, here is what you should do. First, locate the M.
2 slot on your computer’s motherboard. It is a narrow, rectangular slot with a key notch located near the center. Before inserting the SSD, make sure that the slot is clean and free from any debris or dust.
Next, carefully align the notches at the end of the SSD with the keys in the slot and slide the SSD into place. Do not force the SSD into the slot; it should glide in with ease. Once it’s in place, gently screw the SSD into the M.
2 slot using the included screw. You’ll find it on your computer’s motherboard or with the SSD packaging. That’s it! You now have a super-fast storage solution for your computer’s operating system and applications.
With the 970 Pro SSD, you can experience faster boot times, shorter load times, and improved overall performance. So, get ready to enjoy a seamless and hassle-free computing experience!
Secure the SSD with the screw
To install an SSD into your desktop computer, you first need to secure it with a screw. Before doing so, ensure that your computer is turned off and unplugged. Then, locate the empty drive bay on your motherboard and carefully insert the SSD into the bay.
Once it is in place, find the screw hole located on the drive bay and align it with the corresponding hole on the SSD. Then, using a screwdriver, tighten the screw to secure the SSD in place. It is crucial to properly secure the SSD to prevent it from becoming dislodged and potentially damaging your computer or losing your data.
By taking the time to securely fasten your SSD, you can feel confident that it will function optimally and provide you with the fast performance you desire.
Closing & Testing
So you’ve got a new 970 Pro SSD from Samsung, and you’re ready to install it in your system. Congratulations! Here’s how to do it: first, make sure your system is powered off and unplugged. Then, locate the M.
2 slot on your motherboard and gently insert the SSD into the slot, making sure it is firmly seated. Next, use the provided screw to secure the SSD in place. Once that’s done, you’ll need to boot up your system and navigate to the BIOS settings.
Make sure the SSD is recognized in the BIOS and set it as your primary storage device if needed. Finally, test the SSD by transferring some files or running a benchmark tool to ensure that it’s working correctly. With these simple steps, you’ll be up and running with your new 970 Pro in no time!
Replace computer case and plug in all cables
Once you’ve replaced your computer case, the next step is to plug in all the cables. This task is essential to ensure that the components within your computer are connected and communicating effectively. Begin by gathering all the necessary cables and identifying their respective plugs.
Connect all the power cables from your power supply unit to the motherboard, graphics card, and storage devices. Once all the cables are plugged in, it’s time to test your newly assembled computer. Turn on the power supply and press the power button on your computer case.
If everything is connected correctly, the computer will start up with no issues. However, if there are any problems, double-check the connections and consult your computer’s manual. Now that you have completed these final steps, you can enjoy your upgraded computer’s improved performance.
Power on the computer and enter the BIOS
After completing the installation process, it’s time to close your computer case and power on your machine. Once it’s started up, pay attention to the very first text that appears on the screen because it will usually contain instructions for getting into the BIOS. In most cases, you’ll need to press a key such as F2 or Delete.
Entering the BIOS is crucial because it lets you configure various settings and options that can affect how your computer performs. You can adjust things like fan speeds, RAM timings, and even overclock your CPU if you’re into that sort of thing. Once you’re in the BIOS, take some time to familiarize yourself with the options available and make any necessary adjustments.
After making changes, it’s important to test that your computer is running smoothly. Stress testing tools like Prime95 and FurMark can help you evaluate your system’s stability and identify any potential issues. By taking the time to appropriately close your computer and configure your BIOS, you’ll be setting yourself up for a better computing experience overall.
Verify the SSD is recognized and configure boot order
Closing & Testing the computer system after installing a new SSD is crucial to ensure that everything is working perfectly. The first step is to verify that the SSD is recognized by the system. In most cases, the BIOS will automatically detect the new drive, but if it doesn’t, you may need to open the BIOS and check.
Once the SSD is recognized, it’s important to configure the boot order to ensure that the computer boots from the correct drive. Make sure that the new SSD is set as the primary boot device. Finally, it’s time to test the new SSD.
Run some benchmark tests to ensure that the SSD is performing as it should, and also check that all your installed apps and programs are working properly. A quick system reboot will confirm that everything is running smoothly. With these steps completed, you can be confident that your new SSD is properly installed and ready to take your computer performance to the next level!
Conclusion
Installing the Samsung 970 Pro SSD is as easy as pie, but the real icing on the cake is the lightning-fast speed and massive storage capacity that this piece of hardware packs. So, buckle up, get ready to kiss those slow boot times goodbye, and say hello to a high-performance computing experience like never before! Remember: the Samsung 970 Pro SSD is the #1 choice for gamers, power users and professionals seeking cutting-edge technology, so don’t miss out on all the fun!”
FAQs
What is the difference between the Samsung 970 Pro SSD and other SSDs?
The Samsung 970 Pro SSD has superior read/write speeds, endurance, and reliability compared to other SSDs on the market.
How do I know if my computer is compatible with the Samsung 970 Pro SSD?
You can check your computer’s compatibility by looking at the specifications for your motherboard. The Samsung 970 Pro SSD is compatible with most modern motherboards that have an M.2 slot.
What is the installation process for the Samsung 970 Pro SSD?
First, you need to locate the M.2 slot on your motherboard. Then, carefully insert the Samsung 970 Pro SSD into the slot, making sure that it is securely in place. Finally, connect the necessary cables and configure your operating system to recognize the new drive.
How can I maximize the performance of my Samsung 970 Pro SSD?
You can maximize the performance of your Samsung 970 Pro SSD by ensuring that you have the latest firmware updates installed, enabling the drive’s built-in TRIM function, and configuring your operating system to use the SSD as the primary boot device. Additionally, you may want to consider adjusting your computer’s power settings to allow for high-performance mode.