
If you’ve been using your 2012 MacBook Pro for a while, it’s no surprise if you’re experiencing slower speeds and performance issues. However, there’s a quick and simple solution to give your Mac the boost it needs: upgrading to an SSD. In this step-by-step guide, we’ll show you how to upgrade to an SSD and give your MacBook Pro a new life! First, let’s explain what an SSD is: it stands for Solid State Drive, a storage device that is faster, more reliable, and durable than the traditional hard drive.
Instead of using spinning disks to store data, SSDs use flash memory chips, which results in faster read and write speeds. The benefits of SSD can make a noticeable difference in your MacBook Pro’s speed and performance. However, the process of upgrading your MacBook Pro’s hard drive to an SSD may seem daunting, but fear not! We’ve broken it down into simple steps that anyone can follow.
In this guide, we’ll cover the tools and materials you need, how to backup your data, how to clone your existing hard drive onto the new SSD, and how to install the new SSD into your MacBook Pro. By the end of this guide, you’ll have a faster MacBook Pro that can handle your day-to-day tasks without any hassle. So, let’s get started on upgrading your MacBook Pro with an SSD!
What You Need
If you’re an owner of a 2012 MacBook Pro, upgrading the solid-state drive (SSD) might be a beneficial way to breathe new life into your device. To start with, you should check what type of SSD your MacBook Pro is compatible with, as there are various sizes and models in the market. Common drives that support this MacBook model are the Samsung 860 EVO and the Crucial MX500.
Make sure to connect your MacBook Pro to a stable power source during the upgrade process. Then, make a backup of all important files and settings since the process will require erasing the existing drive. You can then remove the bottom cover and the current drive, insert the new SSD into the drive slot, and reinstall the operating system (OS).
Follow these steps accurately to avoid any damage or errors. A new SSD can improve your MacBook’s performance in ways such as faster boot times and better multitasking abilities, giving it a new lease of life.
Compatible SSDs and Tools
When upgrading your computer’s storage with an SSD, it’s important to make sure that the SSD is compatible with your system. Not all SSDs will work with all computers, so it’s crucial to do your research. Some factors to consider when choosing a compatible SSD include the type of interface your computer uses (such as SATA or PCIe), the form factor (
5-inch or M.2), and the storage capacity you need. Additionally, you’ll need some tools to install the SSD, such as a screwdriver, and you may need software to clone your existing hard drive onto the new SSD.
Before making any purchases, make sure to double check that your computer supports the SSD you’re considering. By taking the time to ensure compatibility and having the necessary tools and software, you can upgrade your computer’s storage with ease and enjoy faster speeds and improved performance.
Preparing Your MacBook Pro
If you’re looking to upgrade your 2012 MacBook Pro with an SSD, there are a few things you’ll need to do to prepare. First, you’ll want to make sure you have a backup of all your important files and data. This can be done using Time Machine or any other backup software of your choice.
Once you’ve backed up your data, you’ll need to gather the necessary tools – a screwdriver set, an anti-static mat or wristband, and of course, your new SSD. Next, you’ll need to open up your MacBook Pro and remove the old hard drive. This can be a bit challenging, but with the right tools and some patience, you should be able to get it done.
Once you’ve removed the old hard drive, you’ll need to install the new SSD in its place and secure it with the screws. Finally, you’ll need to reinstall macOS on your new SSD and restore your backed-up data. With a bit of effort and some know-how, upgrading your MacBook Pro with an SSD can be a worthwhile investment that can significantly improve your computer’s speed and functionality.
Backup Important Data
Backing up important data is a fundamental step in preparing your MacBook Pro for any unforeseen circumstance. Losing data due to a system failure, malware, or accidental deletion can be a frustrating and costly experience. Therefore, before anything else, it’s crucial to ensure that all of your valuable data is safe and secure.
Backing up data can be done in many ways, including using cloud-based services or external hard drives. These options provide you with reliable ways to keep your files safe and readily available even when your MacBook Pro encounters technical problems. Always remember to make a habit of backing up your data regularly to avoid the risk of losing valuable information.
Ultimately, taking the time and effort to prepare your MacBook Pro and safeguarding your data can save you time, money, and stress in the long run.
Create Bootable USB Drive
Creating a bootable USB drive is essential when preparing your MacBook Pro. It allows you to install or upgrade the macOS operating system, repair damaged disks, or run diagnostic tools. To create a bootable USB drive on your MacBook Pro, you will need a USB drive with a minimum capacity of 8GB, the macOS installation package from the App Store, and a third-party tool like Disk Maker X or Terminal.
Disk Maker X is a user-friendly application that automates the process of creating a bootable USB drive, while Terminal requires some basic computer skills to execute the commands. Once you have the necessary tools, simply follow the instructions provided by the tool of your choice. Remember to back up your data before proceeding, as creating a bootable USB drive involves erasing the entire disk.
Don’t forget to eject the USB drive safely before removing it from your MacBook Pro. By creating a bootable USB drive, you can avoid costly repairs or time-consuming trips to the Genius Bar, ensuring your MacBook Pro is up and running in no time.
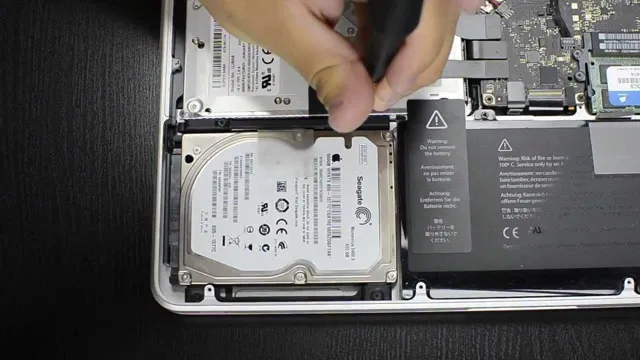
Replacing the Hard Drive with SSD
Upgrading your 2012 MacBook Pro’s hard drive with an SSD is a great way to improve its performance and extend its lifespan. The process involves a few simple steps, but it’s important to have the right tools and know-how before you begin. First, you’ll need to back up all your data to an external hard drive or cloud storage.
Then, you’ll need to remove the bottom cover of your MacBook Pro and locate the hard drive. Once you’ve found it, carefully remove it and replace it with your new SSD. You’ll then need to reinstall macOS on your new drive and transfer your data back to your computer.
With an SSD installed, your MacBook Pro will boot up faster, launch applications more quickly, and have a better overall performance. So if you’re looking to give your old MacBook Pro a new lease on life, upgrading to an SSD is definitely worth considering.
Removing the Old Hard Drive and Installing the SSD
If you’re planning on replacing your computer’s hard drive with an SSD, the first step is to remove the old hard drive. This process can vary depending on your computer’s make and model, but generally involves opening up the case and locating the hard drive. Once you’ve found it, you’ll need to unscrew any mounting brackets and carefully disconnect the cables.
Take note of how the old hard drive was configured so you can replicate it with the SSD. Installing the SSD is a similar process – attach it to the mounting brackets and connect the cables. Keep in mind that it’s important to handle the SSD with care, as it’s a delicate piece of equipment.
Once everything is in place, you’ll need to reinstall the operating system and any important programs or files. With the SSD in place, your computer should boot up faster and perform better overall. You’ll also need to make sure you dispose of the old hard drive properly – either wipe it completely or physically destroy it to ensure your data is secure.
Formatting the SSD and Installing macOS
If you’re looking for a significant boost in your Mac’s speed, replacing the hard drive with an SSD might be the way to go. SSDs are faster and more reliable than traditional hard drives, and the process of replacing the drive is relatively straightforward. Once you have the SSD, you’ll need to format it and install macOS.
To do this, you’ll need to create a bootable USB drive with the macOS installer on it. After that, you’ll need to install the SSD in your Mac, boot from the USB drive, and follow the on-screen instructions to install macOS onto the new drive. The process may seem a little intimidating, but with a little patience and some basic technical knowledge, you can have a lightning-fast Mac in no time.
So, don’t wait any longer and take the leap to upgrade your Mac with an SSD today!
Post-upgrade Optimization
If you’re looking to upgrade your 2012 MacBook Pro with an SSD, you’ll notice a significant improvement in speed and performance. However, it’s important to optimize your new SSD to get the most out of it. One of the first things you’ll want to do is enable TRIM support, which helps to maintain the performance of your SSD over time.
You can do this by using a utility like Trim Enabler or by using the command line to enable TRIM manually. It’s also a good idea to disable any unnecessary startup items and applications, as these can slow down your system and use up valuable resources. Additionally, you can set your SSD as the default startup disk in System Preferences to reduce boot times.
It’s important to note that if you’re replacing your old hard drive with an SSD, you’ll want to consider backing up your data and cloning your old drive before installing the new one. With a little bit of post-upgrade optimization, your 2012 MacBook Pro will be running faster and smoother than ever before.
Enabling TRIM and other Settings
Post-upgrade optimization is crucial for ensuring that your computer operates at its best capacity. Enabling TRIM is one of the key steps in this process. TRIM aids in maintaining the efficiency of solid-state drives (SSDs) by preventing the drive from slowing down if it becomes full.
A full drive makes it harder for an SSD to find open cells to write new data, causing it to slow down. Enabling TRIM ensures that the data is wiped out from cells that are no longer in use, allowing the SSD to perform more efficiently. It’s also important to optimize other settings such as updating drivers, clearing cache and cookies, and removing unnecessary software.
By doing so, your computer will operate faster, more efficiently, and with fewer errors.
Tips to Maximize SSD Performance
Congratulations on upgrading your PC or laptop with an SSD! Now it’s time to optimize your new drive to get the most out of it. One key factor to maximize SSD performance is to make sure that the operating system’s partition is aligned properly. You can use a third-party tool like EaseUS Partition Master to ensure that the SSD’s partition is correctly aligned.
Additionally, disabling features like defragmentation and indexing can help prevent unnecessary wear and tear on your SSD, improving its longevity. Another crucial step to enhancing SSD performance is to avoid filling the drive to capacity, as this can cause the drive to slow down. By keeping at least 20% of free space on the drive, you can ensure that it continues to operate at optimal speeds.
These post-upgrade optimizations can help your SSD operate at peak performance and ensure that your computer runs smoothly.
Enjoy Your Upgraded MacBook Pro
If you’re still using a 2012 MacBook Pro, it’s time for an upgrade. One of the best ways to breathe new life into your old machine is by installing an SSD (solid-state drive). Not only will it make your computer faster, but it will also extend its lifespan and improve its performance.
The process of upgrading is easier than you might think, and you’ll only need a few tools and some basic know-how. First, you’ll need to purchase an SSD that’s compatible with your MacBook Pro. Next, back up all your data onto an external hard drive, since you’ll need to erase everything from your current hard drive during the installation process.
You’ll also need a screwdriver and some patience to open up the bottom of your MacBook Pro and replace the old drive with your new SSD. Once you’ve installed the new SSD, you can then install macOS and transfer your files back onto your computer. With your upgraded MacBook Pro, you’ll notice a significant boost in speed and performance, making it feel like a brand new machine.
So, don’t hesitate any longer and get started on your 2012 MacBook Pro SSD upgrade today!
Conclusion
In conclusion, upgrading your 2012 MacBook Pro with an SSD is like giving your trusty old steed a new lease on life. With faster boot times, smoother performance, and increased storage capacity, you’ll wonder how you ever got by without it. It’s like upgrading from a flip phone to a smartphone – once you make the switch, you’ll never look back.
So don’t be afraid to take the plunge and give your computer the upgrade it deserves. Your future self will thank you!”
FAQs
What size SSD can I upgrade to in my 2012 MacBook Pro?
The maximum supported SSD size for a 2012 MacBook Pro varies depending on the model. The 13-inch MacBook Pro supports up to a 2TB SSD, while the 15-inch MacBook Pro supports up to a 4TB SSD.
Can I upgrade the RAM in my 2012 MacBook Pro along with the SSD?
Yes, you can upgrade both the SSD and RAM in your 2012 MacBook Pro. However, the process for each upgrade is different and may require professional assistance.
What tools do I need to upgrade the SSD in my 2012 MacBook Pro?
You will need a Pentalobe screwdriver, a Torx screwdriver, an external hard drive, and an SSD with the appropriate connector type (either SATA or PCIe).
Is it possible to transfer my data from the old SSD to the new one during the upgrade process?
Yes, you can transfer your data from the old SSD to the new one either by using an external hard drive or by using cloning software. Cloning software like Carbon Copy Cloner or SuperDuper can make the process easier and faster.